As a quilter, you’ll need to choose fabrics that speak to you. You may want to visit your local quilt shop and play with their fabric stacks.
Be sure to wash and dry your fabrics as per the directions on the label and test for colorfastness. Lightly starching your fabric makes it easier to cut, and ironing it flat helps with accurate measurements.
Choose Your Fabric
The fabric you choose to make your quilt will impact its overall look and feel. Some sewists have a strict preference for certain fabrics — usually 100% quilting cotton, as it is more durable and easy to cut and work with than other types of fabric.
Others prefer to use curated fabric bundles such as fat quarter bundles, jelly rolls or charm packs. These bundles are designed to pair seamlessly together, which takes some of the pressure off when selecting fabrics for a specific pattern. For beginners, this is a great option to build quilting confidence before branching out on their own to select individual fabrics for their quilts.
When selecting your fabrics, take into consideration the pattern and color scheme of your quilt. Many quilt patterns list a range of fabric sizes and colors needed to complete the project. It is important to have a variety of light and dark values to create a balanced quilt.
You should also keep in mind the scale of your quilting pieces. Some of these will require larger fabrics, while others will need to be smaller in size. It is important to check the sizing of your fabric when reading quilting cutting directions to ensure that the pieces will fit together correctly. Some quilt pattern designers may list a “WOF” or “sub-cut” symbol on the cutting instructions to indicate whether or not you should cut the piece on the fold of the fabric.
Set Up Your Workspace
Quilting is a relaxing and therapeutic hobby. Whether you enjoy the process of designing and creating your own masterpieces or refashioning an existing pattern, setting up your sewing room or craft table in the best possible manner can make your experience that much more enjoyable.
Proper lighting is essential for designer ikat fabric, precise cutting, and detailed stitching. Installing a lamp with adjustable daylight bulbs above your sewing machine and/or cutting table can provide focused illumination exactly where you need it.
An efficient quilting space is also a place where your fabrics, patterns, and tools are neatly organized and readily available when needed. Storage solutions like pegboards with hooks or clear plastic containers with dividers can help you keep your rulers, scissors, pins, and other quilting tools sorted by type and size, making them easy to find when inspiration strikes.
In addition, consider having a designated area for washing and drying fabrics before you begin to cut them. While some sewists are willing to skip this step, prewashing the fabric can eliminate any extra dye from the fabric and reduce the likelihood of bleeding or color-matching issues when you’re ready to use them for your finished quilt. It’s important to iron the fabric thoroughly before you start cutting it, too, as removing wrinkles can make it easier to achieve precise cuts and ensure that your pattern pieces will fit together perfectly.
Prepare Your Fabric for Cutting
The fabric you use for sewing must be correctly prepared to avoid fit, misalignment and shrinkage issues in the final garment. The fabric should be thoroughly washed before cutting so that it is a little damp but not wet, and should be lightly starched so that it is easier to cut.
The first step is to square off the fabric edges. It is important to do this accurately because it will make all subsequent cuts much more accurate.
Once the fabric is squared, it is then ready to be cut. It is best to start with the WOF (width of fabric) strips, as these are usually the first listed in the pattern’s cutting chart. When you are ready to cut the first strip, line a thin line on your ruler up with the fold in the fabric (it may be helpful to mark this point on the fabric with a fabric pen or pencil). Cut using your rotary cutter (preferably with the blade pointing away from your body) following the lines on the quilting ruler.
Remember that you must always cut from your dominant hand (right-handed if you are right-handed). If you have a pair of cheap scissors that are just fine for cutting the paper patterns, this is the time to use them. Also, be sure to keep the rotary cutter closed when not in use to prevent injuries and accidents.
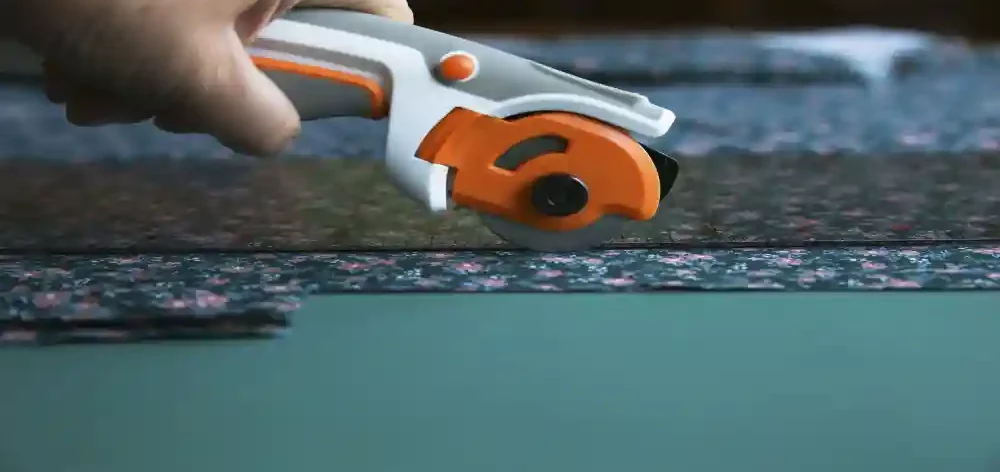
Cut Your Fabric
Once you have the fabric and tools ready, it’s time to start cutting. This is the first step that will impact the rest of your quilt-making process, and it’s also where a few mistakes can really stop a project in its tracks.
Before you start rotary cutting, make sure the fabric is flat and crease-free. The fabric should have a smooth lengthwise fold, selvage to selvage, and the bolt edge should lay flat with no pull lines. If the fabric is still twisted or wrinkled after you fold it, iron it before proceeding. It’s a good idea to prewash your fabrics, but you can also wash them by hand and let them air dry to protect the vibrancy of the colors.
Always cut away from yourself, and use a sharp rotary cutter blade to achieve the most accurate cuts. A dull blade is much more likely to slip and cut inaccurately.
Most quilt patterns include a list of cut sizes and the corresponding number of strips needed for the pattern. This is typically referred to as ‘width of fabric (WOF)’. The WOF measurement is taken from the selvage edges of the fabric and will differ between different fabric manufacturers.
Always cut WOF strips first, and then cut the smaller pattern pieces from those. Check your quilt pattern’s cutting chart and follow the instructions carefully.